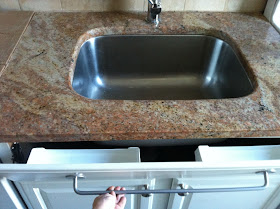
Does your sink have one of those fake panels that looks like a drawer front but doesn't open? Some cabinetry lines use this space for a tip-out tray, where you can store sponges and scrubbers. But if your kitchen sink base doesn't have one, you can easily retrofit it.
I retrofitted mine using a kit like this one from Rev-a-Shelf.
I bought mine at Home Depot. They come in various sizes. I bought two 11-inch trays ($18.43 each) to fit my 36" wide cabinet. I considered buying the durable looking stainless steel version, but we are planning to update the kitchen in the near future, so I went with the less expensive polymer one.
Each kit contains everything you need to install one tray: Tray, tip-out hinges and hardware.
Step 1: Before you buy your kit, measure the space from the sink basin underneath your cabinet to the back of the false-front panel, to make sure there will be enough room for the tray to tip out all the way and also to close completely.
Step 2: Take a pencil and lightly trace around the false front, so that you can later refer to its position if you need to.
Step 3: Remove everything from underneath the sink. Really. You are going to be sitting in there quite a bit and you will need every inch of space. Take a seat beneath your sink and shine a flashlight at the back of your false-front panel to see how it is being held in place. They are usually held in place by plastic hardware. Mine looked like a little plastic wheel. Take a screwdriver and pry the wood facing loose from the plastic wheel. The door will snap free.

Step 5. Using the paper template that comes with the instructions, mark your screw holes for the hinges on the back of the false front. (Note: It helps to be sitting under your sink and facing out when you do this, unless you are really good at picturing everything backwards.) Make similar marks for where the screws for the trays will hang.
Step 6: Drill pilot holes on the back of the false front, being careful not to drill so deep you come out the other side. Some people put a piece of tape on the drill bit to prevent this. Screw the tray hardware in - but do not over-tighten. You will need some give to hang your trays.
Step 7: Following the instructions, install the hinges to the cabinet frame. You will need to be sitting under your sink to do this. If your sink basin has not been installed yet, this will be a breeze. If your sink is already in place, as mine was, this is going to be the most tedious step, due entirely to cramped conditions.
I'm sorry that I did not stop to take progress photos of this tedious step. That's how tedious it was. I couldn't wait to finish. But check out this tutorial on the Lowes site if you need step by step photos regarding the hinges.
Step 8: Attach the other side of the hinge to the false front. It would help to have an assistant to hold it while you do this, but I was able to do it without. This is where your pencil tracing earlier helps position it properly.
Step 9: If your hinges are operating smoothly, hang the plastic trays and install whatever type pulls you are using to the front facing. I installed a towel rack.
Step 10: Take a step back and admire your handy work.
You now have a place to store your sponges and scrubbers out of view. And you've made use of what was previously wasted space.


nice
ReplyDelete