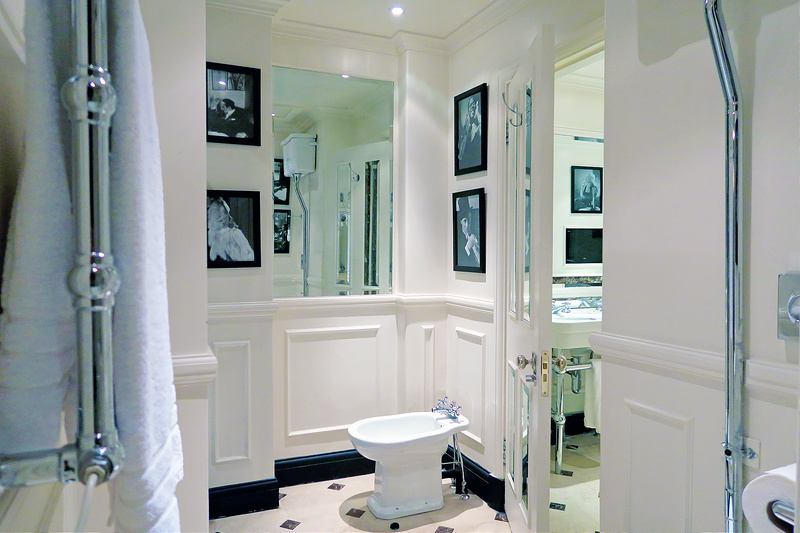
When I designed the bathroom in our 1940s home, I wanted it to look classic and timeless. It didn't have to be a slavish nod to 1940s era bathrooms, but I wanted it to fit the period of our building, to feel as if it had always been there.
My inspiration was a bathroom in the Lillie Langtry suite at the Cadogan hotel in London, where I'd once stayed. It had an old cast iron deep soaking tub, trimmed in marble. When I started to show people my design, I was surprised at all the horrified reactions. "Oh the upkeep!" "You'll be sorry!" "You'll have to seal it every year." So, I'm here to set the record straight: Sealing marble is no. big. deal.
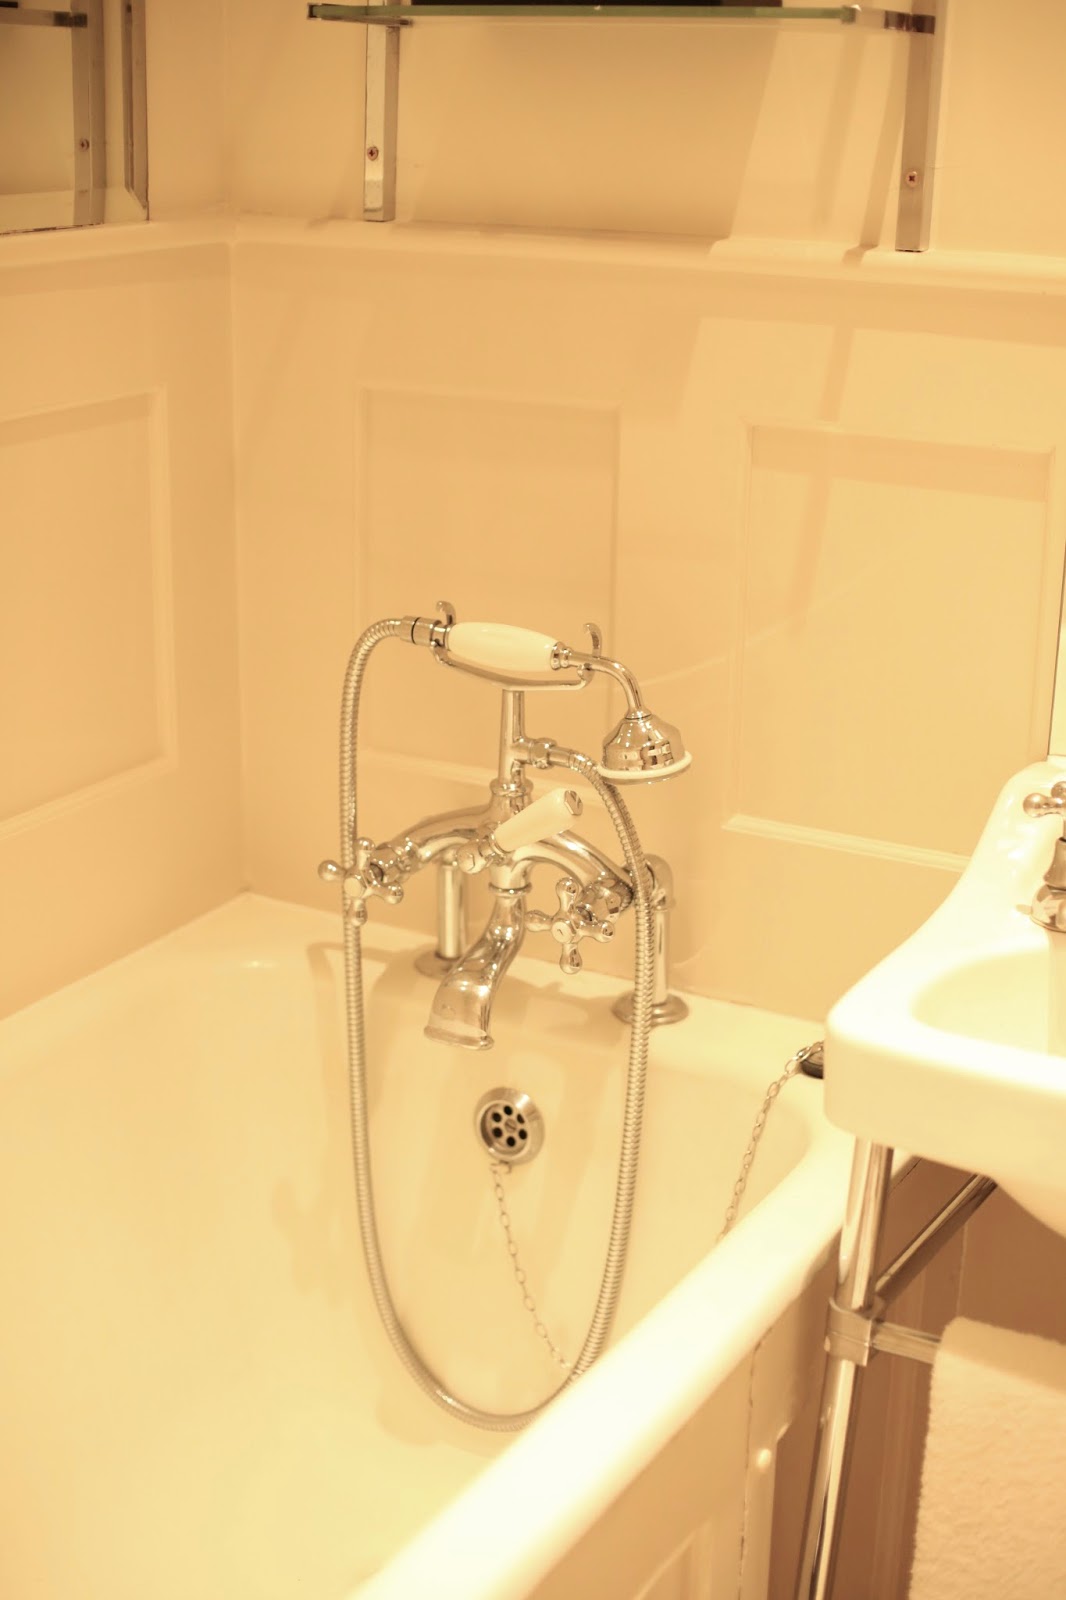
The bathroom at the Cadogan featured a pretty console sink and that deep soaking tub had a marble deck and a paneled, mirrored apron.
I admired the paneled walls, and the mirrored aprons on the cast iron tub impressed me as a clever use of inexpensive materials that still managed to give nod to the period. But it was definitely the marble deck and backsplash that gave the room its stately, timeless elegance.
 |
| My marble tub |
As my design played out in our own remodel, we decided that paneled walls weren't practical in a room that would see a lot of moisture, so I went with beveled subway tile instead. And, though I liked the paneled mirrored aprons very much, as it turned out I fell in love with a slab of Statuary marble and decided to use it on both deck and aprons.
Did using marble give me pause? Yes, it did. Like everyone embarking on a renovation, I read about problems with etching and staining. But I fall decidedly in the "patina" camp, and decided to move ahead with it anyway. You can read about that decision in this look at
my honed marble bath two years later. Today, I want to talk about another thing I kept hearing from people about: the dreaded sealing.
You can hardly bring up marble in a discussion about renovations without someone chiming in with the warning: "You'll have to seal it every year." In point of fact, you do not have to seal it every year. You have to seal it when it no longer passes the water test. To conduct the water test, just splash a bit of water on your marble and see if it beads up, or spreads. If the water spreads, it's time to seal your marble again. We've lived with ours for four years this March, and I'm just sealing it now for the first time. (If this were a kitchen counter that gets wiped down several times a day, it would be a different story.) I thought I'd share some photos of the process.
Sealing Marble
Tools:
- 511 Porous Plus Sealer
- Gloves
- Paintbrush
Step 1: Choose your sealant
I followed the advice of one of my favorite sites
Remodelista and bought Miracle Sealants Porous Plus for $35 a pint from Home Depot. I ordered it online and had it delivered to my local store and it was there by the weekend.
Step 2: Clean your marble
Despite all the horror stories, marble doesn't require sophisticated cleaning solutions and in fact you want to avoid anything abrasive or astringent.
I wipe ours down with a mild dish detergent and warm water.
And use a toothbrush on any buildup.
And that's it for cleaning. If I were to see a stain, I'd search online for the appropriate type of
poultice. That hasn't happened yet.
Step 3: Paint Sealant on the Marble
You don't actually need a paintbrush. You can pour on the sealant and rub it in with a towel. But I liked the control of a paintbrush.
Step 4: Wipe Down the Marble
Allow the solution to seep in for about 3-5 minutes (but not dry), according to the product instructions. Then wipe it all down with a soft cloth.
It takes a few hours to dry but a few days to set. You'll be able to use your bathroom, but not set things down on the marble until 24-78 hours, the latter ostensibly for expansive floor projects that will take longer to dry and set.
Now, that wasn't so bad — was it? Next time you hear anyone moan and groan "you have to seal marble every year," you'll know what you're getting yourself into.
So, what was the result? Everything looks very clean and bright, the way you'd expect it to look if you just wiped it all down.
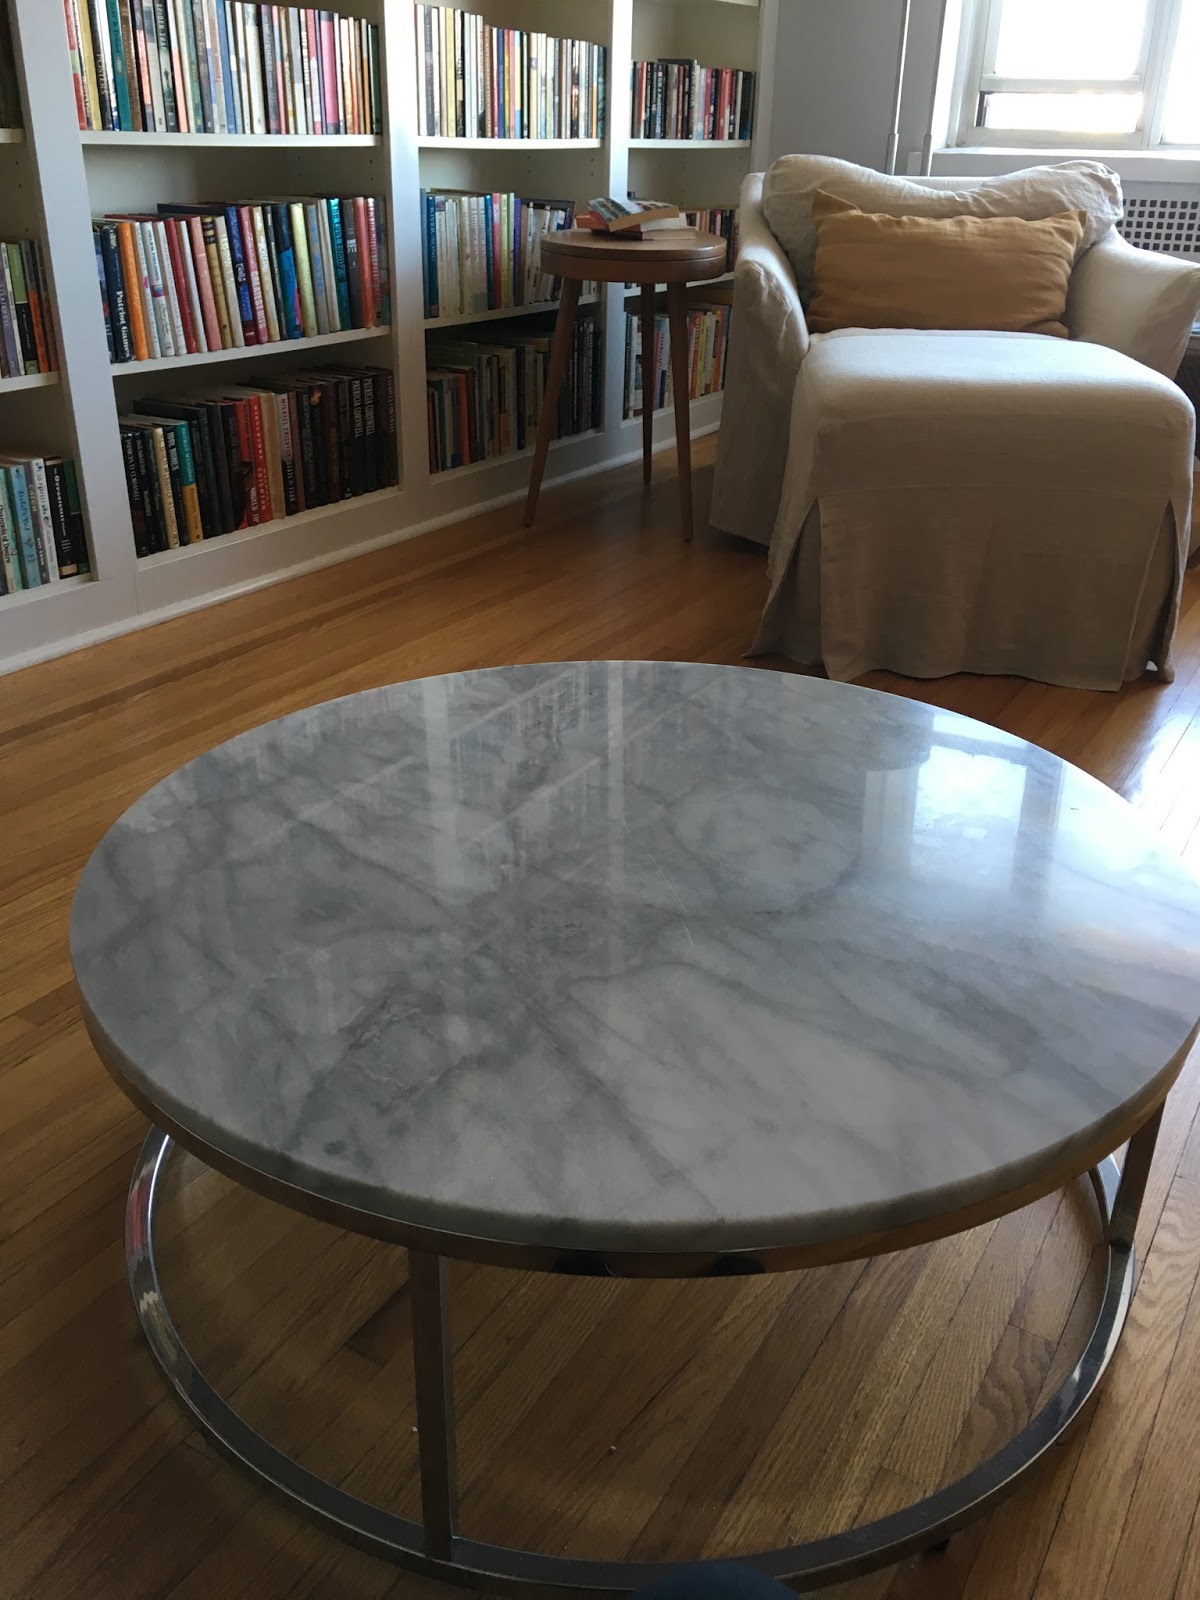
While I had all the cleaning supplies out, I treated our marble coffee table in the living room, too. It's topped with Carara marble that's been polished, not the honed Satuario we have in the bathroom. So it's interesting to see that it can work on either type of stone.
It didn't remove any etching that was already there, including glass rings and droplets I showed in
my honed marble bath two years later. But to my eye everything seems a bit more sparkly, and this turned out to be a project that anyone willing to put in just a tad of elbow grease can strike off the to-do list.
When I designed the bathroom in our 1940s home, I wanted it to look classic and timeless. It didn't have to be a slavish nod to 1940s era bathrooms, but I wanted it to fit the period of our building, to feel as if it had always been there.
My inspiration was a bathroom in the Lillie Langtry suite at the Cadogan hotel in London, where I'd once stayed. It had an old cast iron deep soaking tub, trimmed in marble. When I started to show people my design, I was surprised at all the horrified reactions. "Oh the upkeep!" "You'll be sorry!" "You'll have to seal it every year." So, I'm here to set the record straight: Sealing marble is no. big. deal.
The bathroom at the Cadogan featured a pretty console sink and that deep soaking tub had a marble deck and a paneled, mirrored apron.
I admired the paneled walls, and the mirrored aprons on the cast iron tub impressed me as a clever use of inexpensive materials that still managed to give nod to the period. But it was definitely the marble deck and backsplash that gave the room its stately, timeless elegance.
|
| My marble tub |
As my design played out in our own remodel, we decided that paneled walls weren't practical in a room that would see a lot of moisture, so I went with beveled subway tile instead. And, though I liked the paneled mirrored aprons very much, as it turned out I fell in love with a slab of Statuary marble and decided to use it on both deck and aprons.
Did using marble give me pause? Yes, it did. Like everyone embarking on a renovation, I read about problems with etching and staining. But I fall decidedly in the "patina" camp, and decided to move ahead with it anyway. You can read about that decision in this look at
my honed marble bath two years later. Today, I want to talk about another thing I kept hearing from people about: the dreaded sealing.
You can hardly bring up marble in a discussion about renovations without someone chiming in with the warning: "You'll have to seal it every year." In point of fact, you do not have to seal it every year. You have to seal it when it no longer passes the water test. To conduct the water test, just splash a bit of water on your marble and see if it beads up, or spreads. If the water spreads, it's time to seal your marble again. We've lived with ours for four years this March, and I'm just sealing it now for the first time. (If this were a kitchen counter that gets wiped down several times a day, it would be a different story.) I thought I'd share some photos of the process.
Sealing Marble
Tools:
- 511 Porous Plus Sealer
- Gloves
- Paintbrush
Step 1: Choose your sealant
I followed the advice of one of my favorite sites
Remodelista and bought Miracle Sealants Porous Plus for $35 a pint from Home Depot. I ordered it online and had it delivered to my local store and it was there by the weekend.
Step 2: Clean your marble
Despite all the horror stories, marble doesn't require sophisticated cleaning solutions and in fact you want to avoid anything abrasive or astringent.
I wipe ours down with a mild dish detergent and warm water.
And use a toothbrush on any buildup.
And that's it for cleaning. If I were to see a stain, I'd search online for the appropriate type of
poultice. That hasn't happened yet.
Step 3: Paint Sealant on the Marble
You don't actually need a paintbrush. You can pour on the sealant and rub it in with a towel. But I liked the control of a paintbrush.
Step 4: Wipe Down the Marble
Allow the solution to seep in for about 3-5 minutes (but not dry), according to the product instructions. Then wipe it all down with a soft cloth.
It takes a few hours to dry but a few days to set. You'll be able to use your bathroom, but not set things down on the marble until 24-78 hours, the latter ostensibly for expansive floor projects that will take longer to dry and set.
Now, that wasn't so bad — was it? Next time you hear anyone moan and groan "you have to seal marble every year," you'll know what you're getting yourself into.
So, what was the result? Everything looks very clean and bright, the way you'd expect it to look if you just wiped it all down.
While I had all the cleaning supplies out, I treated our marble coffee table in the living room, too. It's topped with Carara marble that's been polished, not the honed Satuario we have in the bathroom. So it's interesting to see that it can work on either type of stone.
It didn't remove any etching that was already there, including glass rings and droplets I showed in
my honed marble bath two years later. But to my eye everything seems a bit more sparkly, and this turned out to be a project that anyone willing to put in just a tad of elbow grease can strike off the to-do list.


No comments:
Post a Comment