Ever have a simple 2-hour DIY job snowball and take up your whole weekend? That's what happened to me when I set out to replace our old sink basket and faucet with new chrome fixtures.
We are about three weeks from our move-in date. While the contractor finishes up the gut renovation in the bathroom, I am giving the kitchen a DIY refresh. Starting with replacing the cheaply made chrome-look plastic faucet and sink stopper. The "chrome" on both fixtures was starting to peel and the sink stopper was no longer holding water.
Simple replacement, I thought. Easy peasy. Not.
Replacing the faucet was in fact no big deal and took about an hour. I simply looked up the old model online and followed the instructions backwards to disassemble it. But when I went to replace the sink basket, things took a turn for the worse.
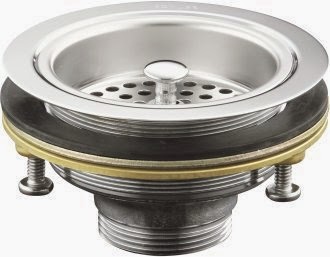
I had ordered in this top of the line chrome strainer basket from Kohler and I was so happy to see the very good quality of it when it came in. The washers are metal and rubber, no cardboard. And it has a tightening system that doesn't require another person standing above while you tightened from below the sink. It seemed like this could be a one man job.
Step 1: I removed the old strainer and wiped away the old plumber's putty from the sink.
Step 2: I rolled some new plumber's putty in my hands, creating a bracelet-size ring.
Step 3: I placed this ring around the new strainer where it would "set" into the drain hole in the sink.
But I hadn't counted on what I would find when I went below to attach the new strainer to the tailpiece. As so often happens with plumbing, one look under the hood revealed pipes in very poor condition:
|
|
The tailpiece was split along the seam and the trap was rotting away
|
Actually, this photo does not tell the whole story, because even though they were falling apart at the seams, those pipes were jammed in place pretty firmly and did not want to budge. Try as I might using two channel lock wrenches torquing in opposite directions, I simply didn't have the strength to pry them loose. I had to call for help.
|
|
Ross, ducking his head under the sink the minute he saw the camera
|
While Ross removed the old pipes, I headed to the big box store to get replacement parts. Before you leave, find out if you need the 1-1/4" or 1-1/2" parts - or better yet, take the old parts with you.
My first shopping trip was a breeze. The plumbing aisle attendant at Home Depot recommended a PVC kit that came with everything I needed, including trim-to-fit tailpiece, trap, and washers.
Once home, I followed the instructions on the kit, carefully measuring, trimming the tailpiece with a hacksaw, then fitting my pieces together. My assembly looked snug, but every time I tested it by placing a paper towel beneath the pipe and running the faucet, I saw wet spots.
So I tried again. And again. And again. Finally, after FIVE trips to Home Depot, multiple cuttings and fittings of PVC tail, and even trying a metal cuff that I had on hand - which I later read is a bad idea, to mix metal and plastic -
this video clued me in that something was wrong with my "washers". They were not quite the right shape. Could my kit possibly have defective washers?
Back to Home Depot with all the parts in hand to learn that my kit
was defective. Instead of two washers and two reducers, my kit contained only reducers.
Once I figured out the problem, I was home free. At last, my pipes withstood the paper-towel test.
 |
| My DIY replacement of a sink basket and tailpipe |
Just to be safe, even though the Home Depot guys said it wasn't necessary, I sealed the pipes with PVC primer and cement.
Ever have a simple 2-hour DIY job snowball and take up your whole weekend? That's what happened to me when I set out to replace our old sink basket and faucet with new chrome fixtures.
We are about three weeks from our move-in date. While the contractor finishes up the gut renovation in the bathroom, I am giving the kitchen a DIY refresh. Starting with replacing the cheaply made chrome-look plastic faucet and sink stopper. The "chrome" on both fixtures was starting to peel and the sink stopper was no longer holding water.
Simple replacement, I thought. Easy peasy. Not.
Replacing the faucet was in fact no big deal and took about an hour. I simply looked up the old model online and followed the instructions backwards to disassemble it. But when I went to replace the sink basket, things took a turn for the worse.
I had ordered in this top of the line chrome strainer basket from Kohler and I was so happy to see the very good quality of it when it came in. The washers are metal and rubber, no cardboard. And it has a tightening system that doesn't require another person standing above while you tightened from below the sink. It seemed like this could be a one man job.
Step 1: I removed the old strainer and wiped away the old plumber's putty from the sink.
Step 2: I rolled some new plumber's putty in my hands, creating a bracelet-size ring.
Step 3: I placed this ring around the new strainer where it would "set" into the drain hole in the sink.
But I hadn't counted on what I would find when I went below to attach the new strainer to the tailpiece. As so often happens with plumbing, one look under the hood revealed pipes in very poor condition:
|
|
The tailpiece was split along the seam and the trap was rotting away
|
Actually, this photo does not tell the whole story, because even though they were falling apart at the seams, those pipes were jammed in place pretty firmly and did not want to budge. Try as I might using two channel lock wrenches torquing in opposite directions, I simply didn't have the strength to pry them loose. I had to call for help.
|
|
Ross, ducking his head under the sink the minute he saw the camera
|
While Ross removed the old pipes, I headed to the big box store to get replacement parts. Before you leave, find out if you need the 1-1/4" or 1-1/2" parts - or better yet, take the old parts with you.
My first shopping trip was a breeze. The plumbing aisle attendant at Home Depot recommended a PVC kit that came with everything I needed, including trim-to-fit tailpiece, trap, and washers.
Once home, I followed the instructions on the kit, carefully measuring, trimming the tailpiece with a hacksaw, then fitting my pieces together. My assembly looked snug, but every time I tested it by placing a paper towel beneath the pipe and running the faucet, I saw wet spots.
So I tried again. And again. And again. Finally, after FIVE trips to Home Depot, multiple cuttings and fittings of PVC tail, and even trying a metal cuff that I had on hand - which I later read is a bad idea, to mix metal and plastic -
this video clued me in that something was wrong with my "washers". They were not quite the right shape. Could my kit possibly have defective washers?
Back to Home Depot with all the parts in hand to learn that my kit
was defective. Instead of two washers and two reducers, my kit contained only reducers.
Once I figured out the problem, I was home free. At last, my pipes withstood the paper-towel test.
|
| My DIY replacement of a sink basket and tailpipe |
Just to be safe, even though the Home Depot guys said it wasn't necessary, I sealed the pipes with PVC primer and cement.


I believe Ross missed his calling, he looks good under a sink. Awesome job Sally, and Ross.
ReplyDeleteLove, Mom And Dad
Thanks, Mom & Dad. Ross was a big help. I was all for taking a hammer and chisel to the old pipes, but he got them out.
DeleteGreat job on your renovations, Sally! You’ve done a great job in selecting the appropriate countertop and sink for your kitchen. Anyway, thanks for sharing your DIY project. How are you now? I hope you're not experiencing any problem with your newly installed sink. :)
ReplyDeleteGeorge Fryer
Thank you, George! It's honestly not a color granite that I would have chosen, but stone is always beautiful in its own right. I think painting the cabinets white will put the granite in its best light.
DeleteThis comment has been removed by a blog administrator.
ReplyDeleteHi Thomas, thanks I think!
DeleteIt's really best to deal with the electric and lighting first before dealing with details such as backsplashes and whatnot. But I guess the timing was perfect, since you were able to inspect the condition of your tail pipes in the process. Those would have been a great source of headaches in the future, had you neglected to check.
ReplyDeleteAngela Cyrenne
Hi Angela, I totally agree. If we had been able to afford to gut renovation this kitchen there is much that I would change like lighting. Having said that, I am happy we discovered this leak early!
Delete