Two of the most visited articles on Renov8or show installation tips for various IKEA window treatments, from
cutting ENJE and SKOGLOVER blinds to fit your windows to
troubleshooting KVARTAL curtains install. We love those IKEA price points; we curse those puzzling hieroglyphics! I was reminded of this just last weekend, when I installed TUPPLUR blackout shades
behind the bamboo window treatments in our bedroom at the cottage. Yes, you can do that! This required a top-mount installation inside the window box, which oddly enough the instructions do not cover, so I had to wing it. As I worked, I took note of some of the more problematic steps; perhaps these notes will be of use to you if you're installing TUPPLURs on your windows. Here are the tricks that worked for me:
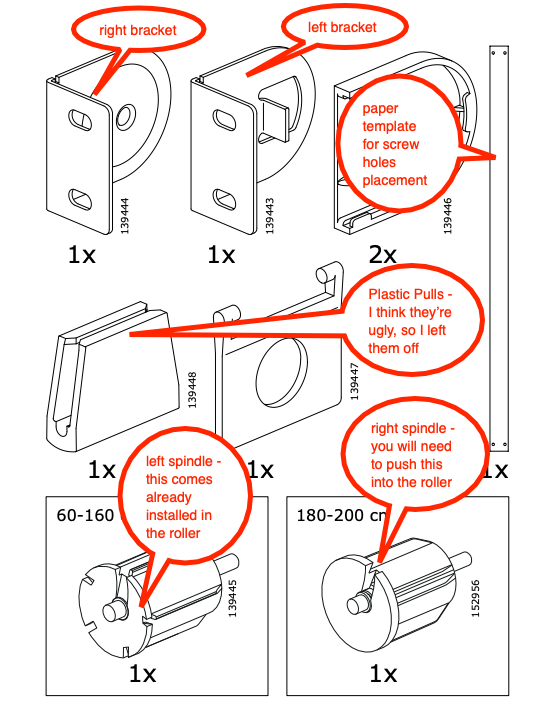
Step 1: Assemble the Parts
Step 2: Tools You Will Need
If you purchased shades that are roughly the width of your windows, you are not going to require a lot of tools to install them:
- Drill
- Small drill bit for pilot holes
- Driver head or screwdriver
- Pencil
If you'll be trimming the blinds to fit, you'll also need a hacksaw, scissors, and some other tools, as discussed in these step by step details about
cutting IKEA blinds to fit your windows.
Step 3: Choose Your Window Shade Orientation
The flexible design of IKEA hardware gives you the option to attach your blinds four ways: 1. inside or 2. outside the window box, hanging from either 3. the top or 4. the sides. Great! This means the blind width does not have to
exactly match the size of your windows. If your windows are, say, 24" wide you could hang a 23" blind inside the box from the top, and the 1/2" space on either side is not going to look odd. On the other hand, if the blinds are a few inches larger than your window box, you could hang them outside the box, affixed to the walls or the ceiling. You've got a bit of wiggle room.
How you choose to hang them will also depend on other factors as well, from whether your window box is deep enough to hold the mounting hardware to whether you intend to have multiple shades or window treatments on your windows.
The window boxes in our cottage are just deep enough to allow me to hang our blackout shades inside the window box, and this was great, as I really wanted to keep the existing bamboo shades for daytime use hanging on the outside of the window box — I love the way these solar shades let in the morning and afternoon sun, especially important in a small cottage. My plan is to to tuck these light-blocking TUPPLURs behind the more decorative shades, so we can pull TUPPLUR shades down at night and make the room nice and dark for good sleeping.
Oddly enough, the IKEA instructions only show three of the four possible orientations; they don't show the inside the box from the top placement that I'd be using, so I had to wing it a bit and sketch out my own (red box above). Then I had to jump to page 8 to follow the "hang from the top" instructions—as best I could.
Step 4: Use the Paper Template to Mark Screw Placement
Using the paper template provided, take a pencil and mark the placement for the four screw holes.
You are not going to find screws in the parts from IKEA. This is because every homeowner needs to choose your own hardware, depending on your type of walls. If you will be
hanging heavy things like blinds and curtains on wallboard or plaster, you will need anchors. I always keep a box of plug anchors handy in multiple sizes. Kits like this are available from any hardware or big box store. Use the size that fits the screw holes in the brackets.
Our window boxes happen to be solid wood, and drilling into solid wood doesn't require anchors, so I went ahead and drilled pilot holes right into the wood, at the points I had marked using the template.
Then I replaced my drill bit with a driver head and drove the screws right into the wood. Now it was time to install the rod.
Step 5: Insert the Spindle in the Rod
The rod comes with the left side spindle already inserted (it has a red plastic ring around it). Go head and insert the right one.
Now, looking at the right spindle, you can see that it clearly gets inserted into the hole in the right bracket. Do that first before looking at the left.
Step 6: Warning
Now comes a tricky step, because the IKEA instructions are clearly warning you about something regarding the tab on the red bracket at the end of the rod — but it's difficult to interpret what the note of caution means.
We're installing our blinds from the top inside the window box—and unfortunately, this is the only orientation that IKEA's instructions do
not show. In our orientation, despite this warning, the red tab is going to be facing the window. If you're doing a top-mount installation, you'll need to do the same. You'll know you've got it right when the metal tab sticking out of the bracket lines up with the linear indentation in the spindle and slides right in, and the blind rolls down the back, or window side. When you've got it, remove the red plastic cap by removing the small pieces of tape that are holding it in place. Toss the red cap into the trash; it's job is done.
Step 7: Install the End Caps
Now that you have both sides installed, slide a white plastic cap over each bracket, left and right. Our blind is now hanging down the back of the roller, as pictured above.
Step 8: Blind Pulls
I'm not a fan of the ugly plastic pulls that come with this blind, and I don't think they're needed. It's easy enough to simply pull the firm end of the shades up and down without them. I tossed mine in the recycling bin.
If you've followed the steps, your work is now complete. The shades will be a bit stiff when they're new, so pull them down let them retract up. Do that a few times until that they begin to stop where you want them to stay.
Having used our TUPPLUR blackout shades for a few nights, I can attest they do the job of blocking out the light from our neighbor's yard and porch, as well as the occasional beam from a passing car. We actually slept-in a couple hours later than usual this weekend, and that makes this quick little DIY definitely worth the time.


Two of the most visited articles on Renov8or show installation tips for various IKEA window treatments, from
cutting ENJE and SKOGLOVER blinds to fit your windows to
troubleshooting KVARTAL curtains install. We love those IKEA price points; we curse those puzzling hieroglyphics! I was reminded of this just last weekend, when I installed TUPPLUR blackout shades
behind the bamboo window treatments in our bedroom at the cottage. Yes, you can do that! This required a top-mount installation inside the window box, which oddly enough the instructions do not cover, so I had to wing it. As I worked, I took note of some of the more problematic steps; perhaps these notes will be of use to you if you're installing TUPPLURs on your windows. Here are the tricks that worked for me:
Step 1: Assemble the Parts
Step 2: Tools You Will Need
If you purchased shades that are roughly the width of your windows, you are not going to require a lot of tools to install them:
- Drill
- Small drill bit for pilot holes
- Driver head or screwdriver
- Pencil
If you'll be trimming the blinds to fit, you'll also need a hacksaw, scissors, and some other tools, as discussed in these step by step details about
cutting IKEA blinds to fit your windows.
Step 3: Choose Your Window Shade Orientation
The flexible design of IKEA hardware gives you the option to attach your blinds four ways: 1. inside or 2. outside the window box, hanging from either 3. the top or 4. the sides. Great! This means the blind width does not have to
exactly match the size of your windows. If your windows are, say, 24" wide you could hang a 23" blind inside the box from the top, and the 1/2" space on either side is not going to look odd. On the other hand, if the blinds are a few inches larger than your window box, you could hang them outside the box, affixed to the walls or the ceiling. You've got a bit of wiggle room.
How you choose to hang them will also depend on other factors as well, from whether your window box is deep enough to hold the mounting hardware to whether you intend to have multiple shades or window treatments on your windows.
The window boxes in our cottage are just deep enough to allow me to hang our blackout shades inside the window box, and this was great, as I really wanted to keep the existing bamboo shades for daytime use hanging on the outside of the window box — I love the way these solar shades let in the morning and afternoon sun, especially important in a small cottage. My plan is to to tuck these light-blocking TUPPLURs behind the more decorative shades, so we can pull TUPPLUR shades down at night and make the room nice and dark for good sleeping.
Oddly enough, the IKEA instructions only show three of the four possible orientations; they don't show the inside the box from the top placement that I'd be using, so I had to wing it a bit and sketch out my own (red box above). Then I had to jump to page 8 to follow the "hang from the top" instructions—as best I could.
Step 4: Use the Paper Template to Mark Screw Placement
Using the paper template provided, take a pencil and mark the placement for the four screw holes.
You are not going to find screws in the parts from IKEA. This is because every homeowner needs to choose your own hardware, depending on your type of walls. If you will be
hanging heavy things like blinds and curtains on wallboard or plaster, you will need anchors. I always keep a box of plug anchors handy in multiple sizes. Kits like this are available from any hardware or big box store. Use the size that fits the screw holes in the brackets.
Our window boxes happen to be solid wood, and drilling into solid wood doesn't require anchors, so I went ahead and drilled pilot holes right into the wood, at the points I had marked using the template.
Then I replaced my drill bit with a driver head and drove the screws right into the wood. Now it was time to install the rod.
Step 5: Insert the Spindle in the Rod
The rod comes with the left side spindle already inserted (it has a red plastic ring around it). Go head and insert the right one.
Now, looking at the right spindle, you can see that it clearly gets inserted into the hole in the right bracket. Do that first before looking at the left.
Step 6: Warning
Now comes a tricky step, because the IKEA instructions are clearly warning you about something regarding the tab on the red bracket at the end of the rod — but it's difficult to interpret what the note of caution means.
We're installing our blinds from the top inside the window box—and unfortunately, this is the only orientation that IKEA's instructions do
not show. In our orientation, despite this warning, the red tab is going to be facing the window. If you're doing a top-mount installation, you'll need to do the same. You'll know you've got it right when the metal tab sticking out of the bracket lines up with the linear indentation in the spindle and slides right in, and the blind rolls down the back, or window side. When you've got it, remove the red plastic cap by removing the small pieces of tape that are holding it in place. Toss the red cap into the trash; it's job is done.
Step 7: Install the End Caps
Now that you have both sides installed, slide a white plastic cap over each bracket, left and right. Our blind is now hanging down the back of the roller, as pictured above.
Step 8: Blind Pulls
I'm not a fan of the ugly plastic pulls that come with this blind, and I don't think they're needed. It's easy enough to simply pull the firm end of the shades up and down without them. I tossed mine in the recycling bin.
If you've followed the steps, your work is now complete. The shades will be a bit stiff when they're new, so pull them down let them retract up. Do that a few times until that they begin to stop where you want them to stay.
Having used our TUPPLUR blackout shades for a few nights, I can attest they do the job of blocking out the light from our neighbor's yard and porch, as well as the occasional beam from a passing car. We actually slept-in a couple hours later than usual this weekend, and that makes this quick little DIY definitely worth the time.


No comments:
Post a Comment