I finally got around to a small project that I'd been neglecting for some time: The entryway door. It's not that I was blissfully unaware of how bad it looked, but you know, other things. Anyway, here's a shot that I took on my first viewing of this home before we bought it.
Check out the "Fire Safety Notice" sticker. It's sort of like living in a hotel — but not any kind of hotel I'd want to stay at. Previous painters managed to get drips all over it, too. Even though it's one of those removable stickers. They could have removed it, painted, then put it back. They could have. But that would have been a departure from their trademark destructo style.
The first thing I did after being handed the keys to the place was remove the sticker. Sure, fire instructions are a good thing, but I don't think anyone wants to be reminded of fire emergencies while we hang up their coats and offer hospitality, do you?
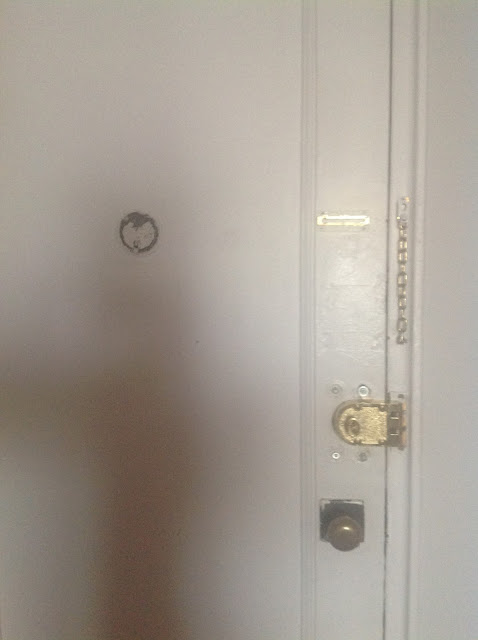
Already, the door was looking slightly better, though the "ghost" of the sticker remained, where the painters had painted around it. Thanks again, painters. Clearly I was going to need to repaint the door. But before I got ahead of myself, the door hardware needed serious attention, because, yeah... painters. (Do we think the previous owners DIY'd this or paid someone? I'm not sure there's a comfortable answer to that.)
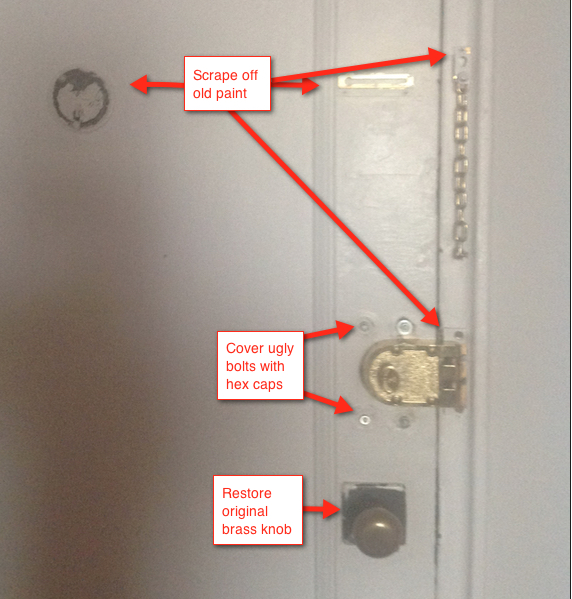
Anyway, here was the plan:
- Scrape away old paint
- Restore peep hole and original brass door knob and buff them out with Brasso
- Sand, fill, and repaint door
- Cover ugly bolts with brass hex caps
Step 1: Chip away at that painted over peep hole.
Using variously a paint scraper, razor scraper (the type used to scrape paint off windows), box cutter, and Exacto knife, I was able to get most the paint off and it only took a few hours.
Check out that peep hole. It's interesting! I'm not sure what metal it is. At first glance I thought brass, but Brasso doesn't shine it up. Perhaps steel with brass plate that has worn off? No, magnets don't stick to it. Could it be copper? I had to experiment with how to clean it properly. The all purpose vinegar and baking soda got it clean, but it didn't improve the shine. It did reveal patent markings: George W. Ackerman, Inc., Pat. No. 1749055.
Googling, I found the patent file from 1926, where the inventor writes: "Object of the invention is to provide a grille which will present a neat and attractive appearance both at the outside and inside of a door, a grille in which the closure may be conveniently manipulated."
Well, I think he achieved his objective. The visitor-facing side of the peep hole is quite nice, and now that I've removed all the gunked up paint, it's very easy to manipulate. Our home was built in 1946, so this is likely an original. Score one for the restorer!
Since Brasso didn't work, I applied a coat of Rub 'n' Buff in Antique Gold.
It turned out a bit more orangey than I expected, but a definite improvement.
Step 2: Restore the door knob.
Using the same tools, I chipped away at all the paint on the doorknob. It cleaned up nicely with a bit of Brasso.
It's also original to the home, and I love its mid-century styling — the square escutcheon with rounded corners. Quality shows in the solid brass construction as well as the shape and hand feel. This is mid-century modern at its best. You can't buy this today, folks.
Step 3: Sand, fill, and repaint door.
Sadly, previous painters had used rollers instead of a brush and this left very visible "stiple" (a bumpy texture akin to the skin of an orange).
I tried to sand it out, but we're talking years of poor paint jobs. To totally remove the stipple I'd have to heat strip this steel door and start from scratch. Which I am tempted to do... Moment of craziness averted.
For now, I had to be content with removing drip marks and filling holes. I didn't take any progress shots of this, but you know the drill: Sand, vacuum, tack cloth, paint.
Step 4: Cover bolts with brass hex caps.
Ah, now we come to the deadlock. I really dislike it, and I've no one to blame but myself. I actually had this thing installed by a locksmith the day we moved in. Mea culpa. We were in a hurry to secure the place, and this was the only model the locksmith had on hand, so I said yes. I'm kicking myself now and will someday replace it with something more appropriate to the period of our home.
Here was the old deadlock, I wish that I had thought to salvage. Sure, it's not original to the house either, but it was older and seemingly had some patina.

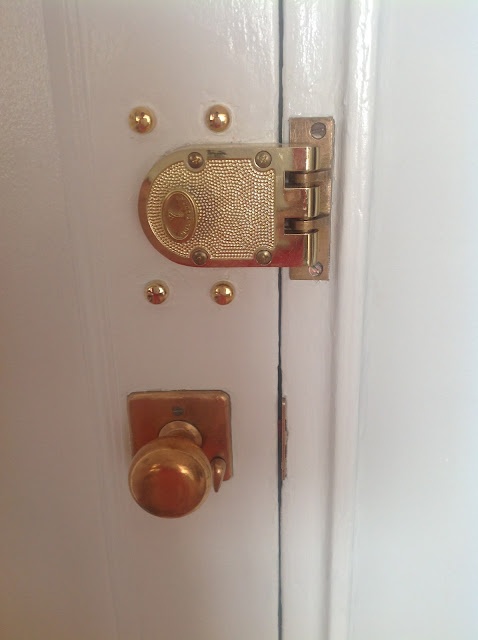
The ugly hex bolts are there because they're holding in place a pick guard on the outside of the door. A pick guard keeps burglars from being able to pick your lock. That's not a serious risk in our doorman building, but it seemed best to leave it rather than deal with the holes removing it would cause. And at just a $1.50 each, four brass hex covers made those ugly bolts disappear!
The door was looking pretty good now!
But I felt something was still missing. It needed a brass kick plate at the foot of the door to tie it all in.
I wanted ours to be solid brass so I custom ordered it. Here's how to order and install a custom kick plate, with step by step photos.
It's a small change, but I think it made a big impact.

I finally got around to a small project that I'd been neglecting for some time: The entryway door. It's not that I was blissfully unaware of how bad it looked, but you know, other things. Anyway, here's a shot that I took on my first viewing of this home before we bought it.
Check out the "Fire Safety Notice" sticker. It's sort of like living in a hotel — but not any kind of hotel I'd want to stay at. Previous painters managed to get drips all over it, too. Even though it's one of those removable stickers. They could have removed it, painted, then put it back. They could have. But that would have been a departure from their trademark destructo style.
The first thing I did after being handed the keys to the place was remove the sticker. Sure, fire instructions are a good thing, but I don't think anyone wants to be reminded of fire emergencies while we hang up their coats and offer hospitality, do you?
Already, the door was looking slightly better, though the "ghost" of the sticker remained, where the painters had painted around it. Thanks again, painters. Clearly I was going to need to repaint the door. But before I got ahead of myself, the door hardware needed serious attention, because, yeah... painters. (Do we think the previous owners DIY'd this or paid someone? I'm not sure there's a comfortable answer to that.)
Anyway, here was the plan:
- Scrape away old paint
- Restore peep hole and original brass door knob and buff them out with Brasso
- Sand, fill, and repaint door
- Cover ugly bolts with brass hex caps
Step 1: Chip away at that painted over peep hole.
Using variously a paint scraper, razor scraper (the type used to scrape paint off windows), box cutter, and Exacto knife, I was able to get most the paint off and it only took a few hours.
Check out that peep hole. It's interesting! I'm not sure what metal it is. At first glance I thought brass, but Brasso doesn't shine it up. Perhaps steel with brass plate that has worn off? No, magnets don't stick to it. Could it be copper? I had to experiment with how to clean it properly. The all purpose vinegar and baking soda got it clean, but it didn't improve the shine. It did reveal patent markings: George W. Ackerman, Inc., Pat. No. 1749055.
Googling, I found the patent file from 1926, where the inventor writes: "Object of the invention is to provide a grille which will present a neat and attractive appearance both at the outside and inside of a door, a grille in which the closure may be conveniently manipulated."
Well, I think he achieved his objective. The visitor-facing side of the peep hole is quite nice, and now that I've removed all the gunked up paint, it's very easy to manipulate. Our home was built in 1946, so this is likely an original. Score one for the restorer!
Since Brasso didn't work, I applied a coat of Rub 'n' Buff in Antique Gold.
It turned out a bit more orangey than I expected, but a definite improvement.
Step 2: Restore the door knob.
Using the same tools, I chipped away at all the paint on the doorknob. It cleaned up nicely with a bit of Brasso.
It's also original to the home, and I love its mid-century styling — the square escutcheon with rounded corners. Quality shows in the solid brass construction as well as the shape and hand feel. This is mid-century modern at its best. You can't buy this today, folks.
Step 3: Sand, fill, and repaint door.
Sadly, previous painters had used rollers instead of a brush and this left very visible "stiple" (a bumpy texture akin to the skin of an orange).
I tried to sand it out, but we're talking years of poor paint jobs. To totally remove the stipple I'd have to heat strip this steel door and start from scratch. Which I am tempted to do... Moment of craziness averted.
For now, I had to be content with removing drip marks and filling holes. I didn't take any progress shots of this, but you know the drill: Sand, vacuum, tack cloth, paint.
Step 4: Cover bolts with brass hex caps.
Ah, now we come to the deadlock. I really dislike it, and I've no one to blame but myself. I actually had this thing installed by a locksmith the day we moved in. Mea culpa. We were in a hurry to secure the place, and this was the only model the locksmith had on hand, so I said yes. I'm kicking myself now and will someday replace it with something more appropriate to the period of our home.
Here was the old deadlock, I wish that I had thought to salvage. Sure, it's not original to the house either, but it was older and seemingly had some patina.

The ugly hex bolts are there because they're holding in place a pick guard on the outside of the door. A pick guard keeps burglars from being able to pick your lock. That's not a serious risk in our doorman building, but it seemed best to leave it rather than deal with the holes removing it would cause. And at just a $1.50 each, four brass hex covers made those ugly bolts disappear!
The door was looking pretty good now!
But I felt something was still missing. It needed a brass kick plate at the foot of the door to tie it all in.
I wanted ours to be solid brass so I custom ordered it. Here's how to order and install a custom kick plate, with step by step photos.
It's a small change, but I think it made a big impact.


No comments:
Post a Comment