 |
| An early SketchUp of my kitchen plan |
As your kitchen plan comes together and you start speaking with vendors and interviewing contractors, it's helpful to have something to show that's more than a collection of inspirational photos saved to Houzz or Pinterest. Contractors can get overwhelmed by too many photos, so I boil it down to just one inspo photo, my room design (with measurements), and a moodboard—I keep mine on my phone at all times, just a click away in dropbox. It's not difficult to create them, and many of the apps you will need are free.
Kitchen Design

As long as your project doesn't require an architect, you don't need architectural renderings to hand to your contractor, but you do need a floor plan that is to scale and includes measurements. If you hire a kitchen designer, they will make one for you, or you can make one yourself. Whoever makes your drawing, the important thing is that someone has accurately measured out your space and indicated positions of doors, windows, and structural features such as pipes and soffits, etc. It's actually pretty easy to create your own kitchen design using IKEA's Home Planner. The app used to be pretty buggy, especially for Mac users, but IKEA made a lot of improvements to it recently. If you take the time to put in accurate measurements of your kitchen, the printouts will show measurements and that will be good enough for a contractor to follow.
 |
Even tracing our your kitchen design on graph paper would be perfectly good enough to get a conversation started with contractors and vendors, as long as your measurements are accurate.
 |
| SketchUp |
Hands-down, my favorite free program to use for home designs is Google SketchUp. I was doing SketchUps of my dream kitchen for two years before I signed with a contractor. As a novice user, I watched YouTubes to get started. Check out My Open Concept Kitchen for links to some of the YouTube videos I watched that brought me quickly up to speed. In just a few hours, I had learned the shortcuts to raising 3D walls and making window and door cutouts, as well as how to quickly sketch cabinets and pull in furniture pieces.
 |
| My SketchUp Kitchen Plan |
This very first SketchUp rendering helped me see that an open concept could work for my space. An early concern was that I have plenty of room for sofas and chairs — and that the living space not feel like one giant kitchen. It became clear to me almost immediately that white slab front cabinets with dark slate counters, which I thought I wanted, wasn't the right design direction for this room. The contrast was too stark.
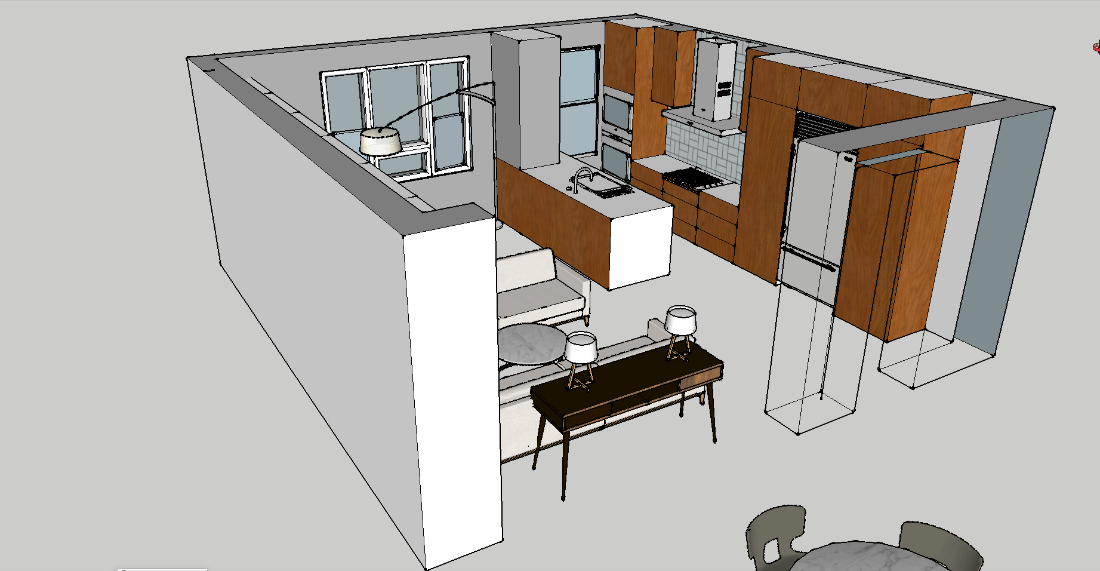
Wood cabinetry, though distinctly mid-century, was also not quite right either. I just don't love wood slab doors enough to want to stare at them all day. Too, they would clash with some of the wood pieces of furniture that I already have. So, these early drawings were a crucial exercise, even though they sent me back to the beginning, looking at inspirational photos.
 |
| Via Houzz |
Main Inspiration Photo
If you're like me, you can have several books on Houzz and multiple boards on Pinterest dedicated to a single project. It's a great way for you to learn what you want, but know that it's not all that helpful to contractors and vendors you speak with. It's best to narrow it down to one.
Once I realized that I wanted to use traditional shaker doors in a modern fashion, with no visible hardware, a search for "Modern Shaker" on Houzz turned up this baby (above), and I knew the minute I saw it that I had found "the one." As I did in our bathroom renovation, I'd be using traditional elements in a new way. White shaker cabinets, with discreet finger pulls the same color as the doors, would disappear into the wall allowing the timeless beauty of marble slab backsplash to really stand out. Fiddling with the new design, I found that subway tile I'd thought I wanted was too clinical. I needed something simpler with grace and flow, and marble slabs was it. And it would echo the use of marble I'd sourced for the bathroom renovation some years earlier.
I had already researched at length about the etching and staining. See My Marble Bath After Six Years. So I sourced a pure white quartz for the countertops—this way I could chop tomatoes, juice lemons, and yes, leave the wine glasses for tomorrow without worry.
Mood Board
Once you've narrowed down your inspirational photos to just one or two, it is fun to pull everything together in a mood board. Things to include: cabinet door style, countertop material, lighting, possibly backsplash or flooring material, and one or two appliances. The end result conveys at a glance the look and feel you're going for in your dream kitchen to someone who may be hearing about your renovation for the first time. I create my moodboards using the free photo editing app Pixlr. I have to admit it took me many months to learn just rudimentary skills on this free version that's akin to Photoshop. If you're a novice to photo editing software, I'd suggest getting started using the free program PicMonkey. There's a collage selection that lets you do basic photo collages. Though most of the more elaborate collage patterns require you to buy an upgrade, between you and me the tool lets you design all the way up to the point of saving, and at that point you can just take a high resolution screenshot.

Floor Plan Before
Floor plans aren't strictly necessary but I find them indispensable when showing my renovation plan to others. You may even already have one from when you purchased your home, if the real estate listing had included a floor plan. If not, no worries. I drew mine using Snagit Pro by TechSmith — a one-time $49 payment for a tool I find essential. I know there are a lot of free screenshot tools out there, but Snagit is much more than a screenshot program. It lets you take screenshots or import photos and write on them using very simple drawing tools. I made my floor plans by pulling in a very old, grainy drawing of our co-op building circa 1946 from the New York City Buildings Department archives. I took a screenshot of it, pulled it into Snagit, then simply limned everything using black rules, circles, and boxes. When I was done tracing every line, I deleted the grainy background image and was left with just my line drawing. I think they look super-clean and elegant.

If you plan to remove a wall, side by side before and after floor plans show at a glance what you're planning to do.
 |
| My Kitchen Before |
Before Photos
One last thing: Don't forget to take lots of before photos. You wouldn't believe how many renovators forget to take them. Most of us who are dreaming of a renovation don't really like to spend time photographing a place we don't love, do we? But make sure you do it, because those gorgeous reveal shots of your dream kitchen are going to look all the better when viewers can see just how bad it really was.

Thank you for this nice sharing. Great post.
ReplyDelete